
HubSpot Tutorial: Setting Up UTM Tracking for Google Ads Campaigns
Step-by-step tutorial to set up HubSpot ad tracking in Google Ads: a script that auto-tags your campaigns and ad groups, a clean tracking template with UTM and hsa parameters, scheduling, testing and GDPR checks.
 MJ17 July 202312 min read
This tutorial walks you through setting up HubSpot ad tracking in Google Ads, using a script that auto-tags your campaigns and ad groups. This setup helps you monitor and optimise your advertising efforts. Here’s how to do it:
Step 1: Create a Google Ads script
Define your campaign objectives
Before diving into creating a Google Ads script, it’s essential to clarify your campaign objectives. What exactly do you want to measure? Clicks, conversions, or how users behave once they land on your site?
These objectives will guide how you configure your automated tracking.
For an effective HubSpot integration, it often makes sense to focus on qualified conversions, such as forms validated by your sales team (sales-qualified leads, or SQLs in sales jargon).
It’s also wise to factor in the return on investment (ROI) of your campaigns.
With clear objectives, you can better assess how effective your ads are and adjust your strategy accordingly.
Write the base script
Once your objectives are set, it’s time to write the Google Ads script. It will automate the collection and sending of tracking data to HubSpot. It needs to be clear, efficient and, above all, compatible with the parameters you want to track.
The base script usually includes functions to extract key information from your ads, such as the campaign ID, ad group and keywords. This data then feeds HubSpot for accurate performance tracking.
We recommend testing the script in a safe environment before deploying it to production, to avoid errors that could skew your data. Adding comments to your code also makes the script easier to understand and maintain, so other team members can quickly see how it works and make changes if needed.
Below is a script that correctly sets the campaign and ad group parameters that will then be passed into the tracking template.
function main() {

var adGroupIterator = AdsApp.adGroups().withCondition("CampaignStatus = ENABLED").get();

while (adGroupIterator.hasNext()) {

var adGroup = adGroupIterator.next();

var gn = adGroup.getName().replace(/\\\\s/g, '_');

var cn = adGroup.getCampaign().getName().replace(/\\\\s/g, '_');

adGroup.urls().setCustomParameters({adgroup: gn, campaign: cn});

}

}
This script loops through all your active ad groups, collects their names and the names of their campaigns, and assigns them as custom parameters.
Step 2: Schedule the Google Ads script
Choose how often it runs
Scheduling the script is crucial to keep your tracking data up to date. Depending on your campaigns, you can run it hourly, daily or several times a day.
Running it frequently gives you near real-time data, ideal for adjusting campaigns quickly. But it can also create data overload and use more Google Ads resources, so find the balance that fits your needs.
Configure the scheduling settings
Once you’ve chosen the frequency, configure the scheduling settings precisely in the Google Ads interface, including the days and times it runs, based on when your audience is most active.
For example, if your audience is mainly active on weekdays during office hours, schedule the script to run during those time slots. This makes the collected data more relevant and supports decision-making.
Also set up alerts in case the script fails, so you can step in quickly without losing valuable information.
It’s also essential to account for seasonal variations that may affect your audience’s behaviour. During sales periods or the holiday season, for example, buying habits can change, which may justify a higher run frequency . By adjusting your scheduling to these trends, you can maximise the effectiveness of your campaigns.
Finally, analyse the results after the script runs. By looking at historical data, you can identify times when your audience is most receptive and refine your scheduling strategy, improving ad performance and focusing budget on the most profitable periods.
Step 3: Configure the tracking template
Integration with HubSpot
The heart of this tutorial is integrating Google Ads tracking with HubSpot. To do this, you configure a tracking template that automatically passes click and conversion data to HubSpot.
This integration usually relies on custom UTM parameters , which let HubSpot precisely identify the source, campaign and content of each click. The Google Ads setup therefore needs to include these parameters in your ad URLs.
HubSpot can then use this information to power its reports and automations, giving you a complete view of the customer journey from the first ad interaction to the final conversion.
Decide which tracking parameters to use
It’s important to clearly define which tracking parameters you’ll use. The most common are utm_source, utm_medium, utm_campaign, utm_content and utm_term. Each plays a specific role in tracking and analysing performance.
For example, utm_source identifies the platform (here, Google Ads), while utm_campaign distinguishes between your live campaigns. utm_content is useful for telling ad variants apart (or, as below, ad groups), and utm_term for tracking keywords.
Structuring these parameters well makes analysis in HubSpot much easier and ensures data comes through correctly, without ambiguity.
It’s also wise to set a consistent naming convention for your UTM parameters: lowercase only, no spaces or special characters, and a uniform campaign format. For example, for a new product launch campaign, you might name your utm_campaign parameter “product_launch_2026”. This not only simplifies analysis but also helps your marketing team collaborate without confusion.
Finally, test your URLs before launching your campaigns. Use tools such as Google’s Campaign URL Builder to check that every parameter is configured correctly. This helps you catch errors that could compromise the quality of the data collected in HubSpot, so every click and conversion is attributed to the right source and campaign.
The tracking template settings as seen in Google Ads.
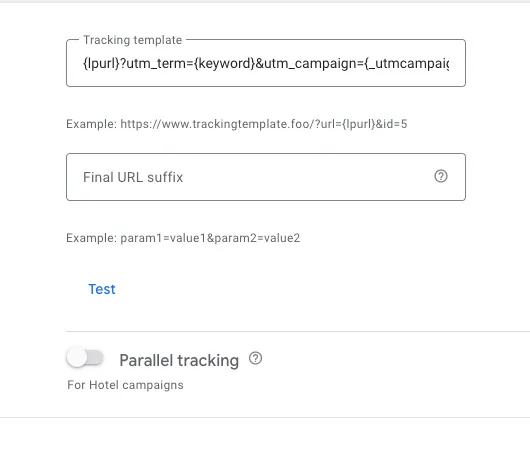
Your tracking template should look like this (replace 1234567890 with your Google Ads account ID, without dashes):
{lpurl}?utm_source=google&utm_medium=cpc&utm_campaign={_campaign}&utm_content={_adgroup}&utm_term={keyword}&hsa_acc=1234567890&hsa_cam={campaignid}&hsa_grp={adgroupid}&hsa_ad={creative}&hsa_src={network}&hsa_tgt={targetid}&hsa_kw={keyword}&hsa_mt={matchtype}&hsa_net=adwords&hsa_ver=3The hsa_ parameters are the ones HubSpot reads: they should point to Google’s ValueTrack parameters such as {campaignid} and {adgroupid}. Because HubSpot is connected to the Google Ads API, it can retrieve the campaign name from this ID. The {_campaign} and {_adgroup} custom parameters are filled in by the script from step 1.
Learn more about the available ValueTrack parameters: https://support.google.com/google-ads/answer/6305348?hl=en#zippy=%2Cset-up-or-edit-a-tracking-template-with-valuetrack-parameters-at-the-ad-group-level%2Cfinal-url-tracking-template-or-custom-parameter%2Ctracking-template-only
HubSpot documentation: https://knowledge.hubspot.com/ads/troubleshoot-ad-tracking-issues
Step 4: Run the Google Ads script
Run the script manually
Before letting the script run automatically, run it manually to check that it works. This helps you catch syntax errors or data collection issues.
During this manual run, check the logs generated by the script and make sure the parameters are correctly added to your ads. If everything looks right, you can move on with confidence.
Monitor the immediate results
After launch, monitor the immediate results in Google Ads and HubSpot. Check that click and conversion data appear correctly in your dashboards.
Good sync between the two platforms is a sign that the script works as intended. If you spot gaps or missing data, go back to your setup to find the source of the problem.
It’s also a good idea to take notes on performance during this initial phase, such as peak hours when clicks seem to rise, or the ads that generate the most interactions. This information can be valuable for optimising future campaigns and adjusting your strategy in real time.
Also compare these results with previous periods. This lets you measure the direct impact of your changes and see whether the script has brought significant improvements. A comparative analysis can reveal interesting trends and help you better understand your audience.
Step 5: Check the changes
Analyse performance data
Once the script is in place and data is flowing into HubSpot, it’s time to analyse your campaign performance. Use the reports to understand which keywords, ads or segments generate the most conversions.
This analysis lets you adjust your Google Ads campaigns based on the insights you gain, maximising your return on ad spend.
Make adjustments if needed
Automated tracking isn’t a set-and-forget solution. Depending on the results, you may need to tweak the script, adjust the UTM parameters or change the run frequency to better fit your needs.
These adjustments are essential to keep data quality high and make sure your tracking stays relevant over time.
Precautions to take
Avoid common mistakes
When setting up this type of automated tracking, some mistakes come up again and again: forgetting to add UTM parameters to every URL, or setting a run frequency so high that it overloads the system.

It’s also common not to test the script enough before deployment, which can lead to wrong or incomplete data. Taking the time to check each step avoids these pitfalls.
Make sure your data is compliant
Finally, make sure data collection and processing comply with current regulations, including the GDPR. Inform your visitors about the use of cookies and obtain their consent where required.
Also secure data exchanges between Google Ads and HubSpot to protect your users’ sensitive information. Good compliance management builds customer trust and avoids potential penalties.
Ready to grow your digital marketing?
Get a free audit from our experts — no commitment.